Written by Steve Patterson. In this Text Effects tutorial, we’ll learn how to engulf text in beams of light and color that radiate through and around it. This version of the tutorial has been fully re-written and updated for Photoshop CS6. If you’re using an earlier version of Photoshop, you’ll want to follow the original Colorful Light Burst Texttutorial.
Here the effect we’ll be creating. Of course, this is just one example of the effect. You can choose whatever text and colors you like:
Step 1: Create A New Photoshop Document
Let’s start from scratch by creating a new document for the effect. Go up to the File menu in the Menu Bar along the top of the screen and choose New:
Going to File > New.
This opens the New Document dialog box where we can set various options for our new document, including its dimensions. For this tutorial, I’ll keep things simple by selecting Web for the Preset option near the top of the dialog box, which automatically sets the Width to 800 pixels and the Height to 600 pixels. It also sets theResolution value to 72 pixels per inch, but unless you’re creating this effect for print, you don’t need to worry about the resolution. The Background Contents option at the bottom should be set to White. Click OK when you’re done to close out of the dialog box and a new white-filled Photoshop document will open on your screen:
The New Document dialog box.
Step 2: Add Your Text
Now that we have our new document, let’s add some text. Select the Type Tool from the Tools panel along the far left of the screen:
Selecting the Type Tool.
Press the letter D on your keyboard to quick reset your Foreground and Background colors to their defaults, which will set your Foreground color to black (and your Background color to white). Photoshop uses the current Foreground color as the text color, which means your text color will now be black as well.
Next, choose your font up in the Options Bar along the top of the screen. This effect will work best with thick letters, so I’ll choose Impact, and I’ll set the initial size of my font to 72 pt. We’ll see how to easily resize the textonce we’ve added it. For more details on working with type in Photoshop, be sure to check out our full Photoshop Type Essentials tutorial:
Setting the font options in the Options Bar.
With the Type Tool in hand, your font options set and black as your text color, click inside the document and add your text. I’ll type the words “LIGHT BURST”:
Adding my text.
When you’re done, click the checkmark in the Options Bar to accept it and exit out of text editing mode:
Clicking the checkmark in the Options Bar.
If we take a quick look in the Layers panel, we see that the text appears on a Type layer above the white-filled Background layer:
The Layers panel showing the newly added Type layer.
Step 3: Resize The Text With Free Transform
If your text appears too small, as mine does, we can easily resize it using Photoshop’s Free Transform command. Go up to the Edit menu at the top of the screen and choose Free Transform:
Going to Edit > Free Transform.
This places the Free Transform box and handles (the little squares) around the text. To resize the text, click and drag any of the corner handles. Press and hold your Shift key as you drag the handles to constrain the proportions of your text so you don’t distort the shape of the letters (make sure you release your mouse button firstbefore releasing the Shift key). You can also move the text into position by clicking anywhere inside the Free Transform bounding box and dragging with your mouse. When you’re done, press Enter (Win) / Return (Mac) on your keyboard to accept it and exit out of Free Transform mode:
Clicking and dragging the corner handles to resize the text.
Step 4: Rasterize The Type Layer
Next, we need to convert our text from a Type layer into pixels, a process known as rasterizing. Go up to the Typemenu (new in CS6) at the top of the screen and choose Rasterize Type Layer:
Going to Type > Rasterize Type Layer.
Nothing will seem to have happened to the text, but if we look in the Layers panel, we see that our Type layer has been converted into a standard pixel-based layer:
The Type layer is now a pixel-based layer.
Step 5: Save The Text As A Selection
We need to create a selection outline from our text and then save the selection so we can load it again later. To create the selection outline, press and hold the Ctrl (Win) / Command (Mac) key on your keyboard and click directly on your text layer’s preview thumbnail in the Layers panel:
Clicking on the preview thumbnail while holding down the Ctrl (Win) / Command (Mac) key.
Photoshop loads a selection around the letters:
A selection outline appears around the text.
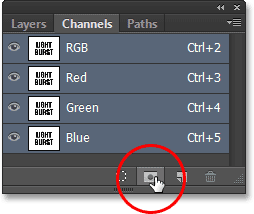
To save the selection, switch over to your Channels panel by clicking on its name tab. You’ll find the Channels panel grouped in beside the Layers panel:
Clicking the tab for the Channels panel.
Then, click on the Save Selection As Channel icon at the bottom of the Channels panel (second icon from the left):


No comments:
Post a Comment